A Day In The A Blue Mountains.

Thanks for visiting my blog. I welcome you to take your time and browse , visiting my bush garden and discovering the wonders of my city within a national park; Blue Mountains National Park. Via my blog you will travel with me through the successes, trials and tribulations of gardening on a bush block. I share with you my patchwork & quilting, knitting, paper crafts, cooking and life in general.
Showing posts with label The Graphics Fairy. Show all posts

Sunday, 16 February 2014

Thank You

Thanks again to Karen at The Graphics Fairy for featuring my clock tutorial once more on her blog.


Recently Karen did a feature on her blog titled  "14 Amazing DIY Wall Decor Ideas" in which my clock was included.
It was a lovely surprise and I feel very privileged to be featured.

You can find the wall clock and thirteen other ideas here.

Karen is an inspirational and generous blogger.
Do stop by and visit her.

I'm sure you will be motivated by her enthusiasm. 

Thursday, 12 December 2013

M.I.A. 'Cause Life is O.T.T. - A.T.M.

I have been missing in action because life is over the top at the moment.

Here is a tiniest look-see into a fraction of what I've been up to...

African Violet


I've been propagating,


Flap Jacks

planting,


Echeveria 

planting some more,


Senecio mandraliscae - Kleinia (?)

and even more.

Zebra Cactus

I also painted a bit.


Echeveria

And did a little bit of pasting.

I've fallen for how these tins have turned out.  The graphic above and below is from The Graphics Fairy.

I used a little bit of outdoor Mod Podge to adhere the graphic (printed in reverse on paper) to the painted tin.   When dry I rubbed off the back of the paper with a damp sponge to reveal the graphic which was then given a final coat of Mod Podge to seal. 


Jelly Bean Plant

Jade

The best thing about all this...is that I've managed to sell all the plants (and more) on a community on-line garage sale.

 
Perennial Basil 

Tuesday, 24 July 2012

Day 206/366


The Graphics Fairy Spring Printable inspired these very-easy-to-make fridge magnets.
All you need is a print out of the bugs and butterflies (at the above link) at a size suitable for your glass pebbles, (I used high resolution paper for printing to stop colour bleed); some good, clear-drying glue, scissors, pencil, and one small, round magnet for each pebble.
Using the pencil, trace pebble shape around selected bug/butterfly, cut out paper shape of image and with image facing up, glue shape to back of glass pebble eliminating air bubbles if they occur. Once the glue/paper is dry,  glue magnet to back of pebble, allow to dry completely and that's it.
What could be simpler?


Friday, 16 December 2011

Twelve Days of Christmas.

Suddenly, Christmas has lost all its glamour.  First with the news that our nephew's partner has been diagnosed with bowel cancer in her mid twenties, and then when I contracted a stomach bug that afflicted me  not only with vomiting but with the vilest stomach cramps I have ever experienced.  
Now I have laryngitis and just the act of speaking is painful.  My energy levels are low.  My Christmas cards haven't even been written let alone posted and the weather has been appalling.
On the bright side though - our Eldest Son is arriving next week, flying over from the west coast and this has spurred me on to do the Christmas food shop today, before my visit to the GP.
This year we've decided on Kris Kringle for the adults so gift buying has been made a whole lot simpler. 
With only twelve days to Christmas this is the most un-organised I ever been I'm sure.
I can only hope that 2012 is a bringer of better news than what 2011 has been.


Monday, 14 November 2011

Alysha's Birthday - 200th Post!

Another journal this time for my dear niece's birthday.
Thanks to the Graphics Fairy for Cute Critters graphic and to the design team at Sketch Saturday (Week #181) for the following sketch.


Happy Creating!

Linked to


The Graphics Fairy

Wednesday, 19 October 2011

Fizzy Fruit Lollies.

It's my BIL's birthday this week.  Normally we only exchange cards but this time I thought I'd surprise him with a card with a twist.  

I know he loves fizzy sweets so I bought this packet for less than two dollars at our local supermarket.
I printed out this graphic of a motor bike from The Graphics Fairy because he is a motorbike freak.
I used A5 size card stock and trimmed the sides to the same width of the label and then added  folds above and below the graphic.

Next it's only a matter of stapling the top fold over the original label to hide (but still accessible) and adding a hand written greeting to the bottom flap.

Fold up the bottom flap and there you have it; a card and gift in one.

Edit-23rd October: Australia Post did a great job of delivering the above gift to BIL so that it arrived in time for his birthday.
He said "it was the best birthday pressy ever".  I guess it helped that he didn't know that we knew that fizzy lollies are his favourite!

Linked to Brag Monday at


Monday, 10 October 2011

My Mother's Birthday.

A Card For My Mother.
Thanks once again to Karen from The Graphics Fairy for the beautiful flower that graces this birthday card which I made for my mother.
My dear Mum turned seventy eight this year and is going through a difficult time with her health.
Land acquisition by the powers that be have made home life a torment for her over the past eighteen months or so.
I can only pray that both sides come to the party real soon, for she can be as obstinate as any government department when she wants to be.

Monday, 12 September 2011

My Sister's Birthday.

My Baby Sister is a photography fanatic (and turning forty nine).
Once again, I'm scrap booking a journal cover - this time one with black pages - to give to her for her birthday and I've tagged it 'Photography Journal'.
Thank you Karen at the Graphic's Fairy for helping me out with graphics.
I created a collage with TGF images and printed out on A4 size buff-coloured paper. You can see how I created the rest here.
I've made a card to match.

Do you like the bead necklace? I estimate the little left over bit to be over forty years old.  I've kept it with my button collection 'just in case'.  (Yes for almost forty years.)
It's so hard to throw things out!  The moment I do I go searching for them.
Eventually I find a use for them.

Happy creating.

Monday, 5 September 2011

Saturday Lunch.

The last time I made these I'd forgotten to photograph them before the family had tucked in.
So here's a photograph that I took last Saturday. 

I made two rounds of the shortbread and gift wrapped one to give to Second Son.  We visited him for lunch at his home in Sydney's Inner West.  I love taking a small gift of food whenever we are invited to friends or family for a meal.
I added a beautiful tag for effect (with graphic from The Graphics Fairy) and some lavender coloured ribbon (of course).  SS was duly impressed.
After a scrumptious lunch of rye bread club sandwiches and mini pavlovas (that my daughter made) we went to Sydney Park to walk off a few calories.  
Grand Daughter was overwhelmed by the playground facilities available at the park. What a wonderful use of space (which once housed a clay extraction and waste disposal site).  The park includes wetlands, dog-off-leash area, amazing playground equipment, a dedicated children's push bike/scooter training area, fitness park, walking paths and great views. 

It is Sydney's largest park.

I didn't take my camera, so photographs are not great as they were taken on my mobile phone.
These chimneys are remnant landmarks from the clay extraction works.

Sculpture on top of the hill.  Sydney Park, Petersham.
After our walk and play in the park we returned to Second Son's house for afternoon tea... kumquat and poppy seed cake, chocolate brownies (both made by SS) and lavender shortbread, with tea or coffee.What a perfect way to spend an afternoon.


I'm linking this post to:

Wednesday, 24 August 2011

All Before Breakfast - Art for Art's Sake.

For my little brother's birthday I'm decorating the front cover of an art journal.  It's A5 size so that it's easily carried about. 


This one I picked up at my local art store. Prices range from $2.95 upwards.
From the Graphics Fairy, I made a collage using this Vintage Ornate Skeleton Key graphic and this Gothic Arch engraving.
While in my photo editing program (I use Picasa) I added the word 'journal' and my brother's initials. I printed this out on the oatmeal coloured A5 card, then trimmed to size.
On the 2nd A5 oatmeal card I printed out various words using different fonts and cut them out, distressed them using the inks before mounting them onto black card cut to size.
Cutting a square into triangles makes a couple of corners to add to the collage.
Next, I cut the white card and the black card to size and rounded the corners on the right side using the punch. 
I added some gold ribbon to the black card which was then mounted onto the white card.
Some tabs were added to one of the word tags and to one side of the collage.
On the black tab the year '2011' is written with white gel pen.
Added the corners distressing with ink as I went.  I finished off the corners with gold split pins. 
More gold ribbon was added to the collage.
All elements were then adhered and layered.
With the journal, I'll include a few pencils and the gift will be complete.

Now, to have breakfast, oh dear, or is that lunch?

I'm linking this post to The Graphics Fairy Brag Monday.  Yes I know...a little late.

The Graphics Fairy


Monday, 27 June 2011

House Warming Gifts.

My most favourite chocolate ever comes in a royal purple wrapper.
My Daughter and Grand Daughter moved house recently and last night we had our first meal together in their new home.
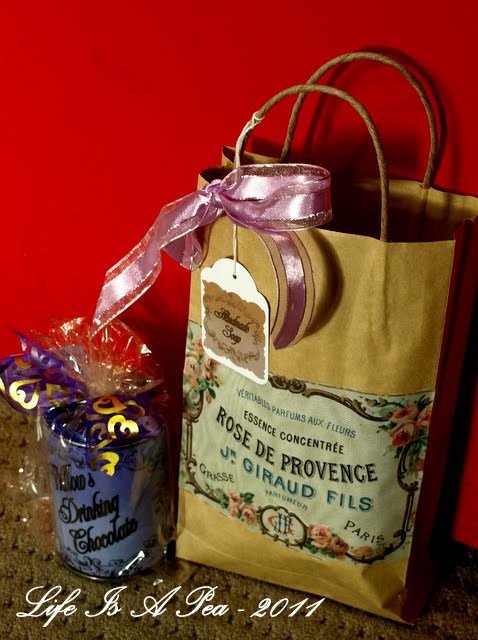
With the help of the Graphics Fairy I transformed a run of the mill container of drinking chocolate to a unique house warming gift in just minutes.
I used the Vintage Fab French advertising frame to which I added text and tint in my photo' editing program. In real life the label is much closer to royal purple than what it appears in the photograph.
Then I printed out the edited graphic on an A4 size label (I love full page labels...cuts out on lots of guess work and I use all the scraps up by re-running them through the printer!).
I made sure that the directions remained uncovered on the canister. 
This is now a personalised canister of drinking chocolate for my Grand Daughter. 
To protect the new label and the container I covered the label and directions with one piece of clear self-adhesive plastic.
I finished off the gift by placing it inside a cellophane bag and tying with matching tag and co-ordinated bow.
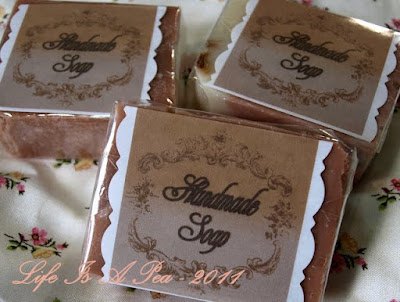
For our Daughter I wrapped some home made soap in cellophane to retain the essential oil fragrance, then using the same graphic as above made individual labels for the soap. 
Once more I used the A4 size label to print out all the labels on one sheet and trimmed them with fancy edged craft scissors before adhering to the individual soaps.  I used clear adhesive plastic once more, to protect the labels.
Next I needed a carry bag for the soap:

The label for the carry bag is printed, again, on the A4 size label and cut to size before adhering to the front of the carry bag.
For tags, I purchased ready made tags from the stationers to which I added matching graphics (also printed out on labels and cut to size and adhered to the tag).
Finally, here are the gifts, all ready to go.
I wish them both a happy life in their new home!
(P.S. vanilla ice-cream sprinkled with drinking chocolate is to die for!)

I am linking this post to the Graphics Fairy, Brag Monday #91.

Comments Welcome

I welcome your comments; they are little personal notes to me. I enjoy reading what each of you have to say. Thanks for dropping by.